BAHN340 is a DOS shareware program of German origin and is available in Library 9 (Games and Simulations) of the CompuServe TrainNet forum, as BAHN340.ZIP. It needs a 286 or better PC with EGA and a hard disk. BAHN340 is also available on the WWW, together with English instructions. For clarity, I've also included a few bits for BAHN340's predecessor, BAHN320. More recently, I've received some notes from BAHN's author.
First create a directory called BAHN340 in a convenient place on your hard disk. Download or BAHN340.ZIP in the normal manner and move it to the above directory, then expand it as follows:
Use PKUNZIP to decompress the ZIP file, by typing:
To run BAHN340, switch to the BAHN340 directory and simply type ONE of the following 3 commands:
Later, you could create batch files to load a layout into BAHN and run it.
Here's how.
Create a batch file called BAHN.BAT
Enter the following three lines, substituting the BAHN names where necessary (don't enter the bracketed comments)
Save the file as BAHN.BAT in your root (or other convenient)
directory.
Now type:
BAHN340 will run and load the <layout name> you entered.
Having created a number of BAHN layouts, and having (I hope) learned from doing so, I would offer BAHN users who want to create a reasonably authentic railway system the following help/ advice/ points to watch. Whilst it is mainly directed towards railway simulations, much of the material will be relevant to tramway networks too.
Get as much source material as possible before starting. Track diagrams are useful if you can get them, but be prepared to change them if needs be.
Decide NOW whether the layout is to be set down in 'geographic' or 'triptique' (Straight line) fashion. I originally preferred the latter as I thought it made for smoother running, but I now prefer to make the layout more geographically correct. Put this down to experience!
When you've worked out the overall route mileage of the longest axis decide on the scale to be used. Watch train lengths if your scale is less than about 30 elements/km.
Leave a reasonable margin of space at either end (say 150 elements). You'll need loops and depots to feed traffic in and out, and probably more than you thought at first!.
Rough out the layout on paper. Refer to a map or published track diagrams if you have them. If you haven't, rough these out on paper first.
Lay out the main line track over the route without any sidings.
Add mileposts. It will help considerably if, as is the case in the UK, the timetables contain mileages. I see from an Amtrak Public Timetable that its the same in the USA.
Lay out each station according to its plan, simplifying it if necessary to fit the scale being used. You'll probably change these when you add the trains.
Put in the main block signalling. You may need to put in a few more signals to control pathing at junctions.
Some contributors, including myself, have used the 'track on road' symbols for underground railways. This helps to better differentiate between single and double line tunnels, and show the various levels the lines are at, and how they duck and weave under ground. Sensible text notes at the tricky bits are also very helpful.
The ratio of km to miles is 50:31. Here's a speed conversion table which you may find useful.
KPH	MPH

10	5
20	15
30	20
40	25
50	30
60	40
70	45
80	50
90	55
100	60
110	70
120	75
and so on.
Dig out the timetable and decide on the principal services and group them. This will give you an idea of what you've got to do.
When you've got the layout reasonably well set up, create a special train and drive it around under manual control. Fix any problems you find as you go.
Put branch trains in first, making sure they run as they should, then add the main liners. You'll probably need to add turning wyes or loops, and modify the station layouts and signalling to make the trains work correctly.
Note that at stations signals must be in advance of the terminal (E in 320) or (T in 340) elements otherwise you'll lock up the block sections!
When you put in each route, and have set up the terminal elements, check the passing times at points on the way. Adjust the maximum speed of each train if you need to, or put in more terminal elements to check their progress.
You may have to delete or put in a few workings to balance the services (i.e. get them back where they started from) if you are using BAHN320.
If you've got trip freight workings (way freights in US jargon, I think), you can make them do switching operations at intermediate points if you use the "alternating switches" feature carefully. You may need to 'seed' a sequence i.e. get some switches to turn rather than go straight by running a special train part way over it, then deleting the train. This can be tricky, but persistence will pay.
I also managed to make loops where passenger trains overtake freights. It was the only way to make the passenger trains run to time on a line like the Waverley route!
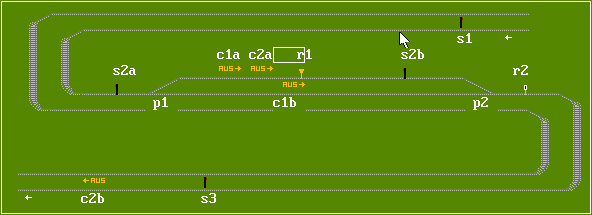
Here's how it's done. Place a stop signal (s2a) for the section ahead immediately in rear of the loop points (p1) (branching switch set to turn freights into the loop). Place the off-contacts for the section in rear (c1a & c1b) in roughly the centre of the loop on the main line, and at the entry to the loop itself. Place an off-contact (c2a) for the section ahead immediately in advance of the last mentioned, followed by a 10kph speed restriction (r1). Put another stop signal (s2b) for the section in advance just in rear of the exit from the loop, and finally a speed restriction (r2) set to that in force for the section of line, to restore the speed of the freight. Here's a diagram. (NB - left hand running)
Here's how it works. A 60mph passenger train is running 'block and block' with a 30mph freight ahead of it. The freight is turned into the loop, which is, say a mile long, clears the section signal s1 in rear when it hits contact c1a, clears the section ahead again at contact c2a and then is checked to 10kph by restriction r1 (roughly 6mph). At that speed, the freight will take 10 clock mins to clear the loop. The passenger train, having got the road passes through the section in rear (at 60mph taking about one clock minute), shuts the section in advance when it passes the entry signal s2a, which also shuts signal s2b ahead of the freight. The passenger then overtakes the freight, clears the section in advance at contact c2b, finally releasing the freight, which will resume its 30mph progress when it hits restriction r2. The critical distances are between signals s1 and s2a, and between restriction r1 and signal s2b, in other words the passenger must get to s2a before the freight gets to s2b.
If your sections are long, then you may also have to put in an extra signal section in rear of the loop to ensure that faster trains can catch up. You will see them marked as Intermediate Block Signals in the Waverley simulation.
Alan Flavell has covered this subject in his Building a Signal installation (BAHN 3.40), so here I'll concentrate on showing some examples of the new features in use.
Regulating Signals:
I'm inclined to refer to 'time switched signalling installations' as 'regulating signals' because that's what they do - regulate the traffic. They take the place of the real people who would normally do this job. In some circumstances they're better than timed terminal sections - departures from more than one platform serving the same route, for instance.
I've noticed the following properties of the time feature:
You may have noticed that if more than one train is standing at signals belonging to the same installation, any one of them could be the first to be released. I've not been able to spot any logic in this. (Has anyone?) Therefore, if the signal installation is to work in harmony with an alternating switch (point), you will almost always need to have a 'cascade' of signals (see below) to ensure 'first in - first out'.
Cascaded signals:
There's no equivalent in real-life railways that I know of, but in essence I just mean a signal holding one train being set off by the passage of another on a different line.
Consider a pair of platforms (P1 & P2) approached by an alternating switch. Train A enters P1. On departure it clears the exit signal of P2 ('Off' Contact c1). When train B enters P2 it will wait, and on departure clear the exit signal of P1 ('Off' Contact c2), and so on. NB These are ordinary train operated signals, not time controlled ones.
Combine this feature with a two signal 'regulating' section, and you can guarantee first in first out. This principle can be extended to as many lines as you want. Here's what I ended up with.
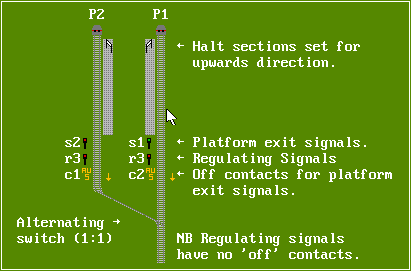
When you set up the platform signals ensure that the 'current counter' setting (the 3rd item in the signal parameter list) is set to 1 for signal s2.
Note that alternating points/switches always lie in the straight direction when they are first used. You can reset them by clicking on their element, then clicking [OK], once on the type selection dialogue box, and once in the 'Wendepunkt' window.
Firstly, I use a good map, such as the UK Ordnance Survey maps, with good representations of landscape features to guide me.
Using the 'crane' I drop about a dozen trees of two or three varieties on each screen at random places, extending to about 10 elements either size of the track. If the map shows moorland, grassland (or desert for that matter) I reduce the density of trees; if it shows forestry, I increase the density. I do all the trees for a section of line before going on to the buildings.
I then go back over the section, and if a small town is shown I drop a few housing symbols, the bigger towns get a higher density, and industrial/ railway areas get some of the appropriate symbols as well.
Using this technique, I can scenic a screen in an average of two or three minutes.
If I know an area well, I will spend more time on it and try (within the limitations of the BAHN320 icons) to make it more realistic. This takes much more time per screen.
It's perfectly possible to have multi-scale layouts if you accept that there will be a small error caused by the maximum speeds of trains being set to that of the main railway, causing them to run faster if the scale is reduced. Speed limit markers can be used to make adjustments on entry to and exit from these sections. I had to do this with the Peebles line on WAVERLEY.NT3 to make it fit in. Remember also to adjust any intermediate speed restrictions proportionally to the increase or reduction in scale.
Used when editing layout- different shortcuts apply when editing trains. I've left this section in as may users may still have the old version, or be using the English Patch for 340 which uses the same shortcuts.
ALT+EDD=delete depot			B=bridges/tunnels
ALT+EDN=new depot			B,f7=speed restrictions
ALT+EDS=show depots			B,f7,f7=line speed markers
ALT+EI=layout description		B,f8=buffers/stopblocks
ALT+ERD=delete route			B,f8,f8=depots
ALT+ERN=new/rename route		C=90 deg. roadway
ALT+ERS=show routes			C,f7=45 deg. roadway
ALT+ES=search for text			C,f7,f7=road bridges
ALT+H=help menu				C,f7,f7=water (f7 again for more)
ALT+HT=layout statistics		I=industrial buildings
ALT+MA=map all (track+scenery)		I,f7=railway buildings
ALT+MF=full screen			N=trees
ALT+MT=map tracks			N,f7,f7=Buildings (f7 again for more)
ALT+OC=transparent cursor		R=90 deg. track, rounded edges
ALT+OT=stop/start clock (Panic!)	R,f7=45 deg. track
ALT+TE=edit train			R,f8= 90deg. track, square edges
ALT+TN=new train			S=colour light signals
ALT+TR=remove train set group		S,f7=semaphore signals
ALT+TT=list of trains			S,f7,f7=signal off contacts
f2=save layout				S,f8=platform sections (rail track set)
f3=load layout				T=stops with poles
f7=back through symbols			T,f7=stops with running in boards
f8=forward through symbols		T,f7,f7=terminals (timed stops) + poles
f9=rail/tram track toggle		T,f7,f7,f7=above with running in boards
f10=toggle description/lie of track 	W=45 deg. points/switches
<space>=invokes text input		W,f7=diagonal points
+=speed up clock			W,f7,f7=90 deg. points
-=slow down clock			W,f8=crossings
Used when editing layout- different shortcuts apply when editing trains.
ALT+EDD=delete depot			B=bridges/tunnels
ALT+EDN=new depot			L=speed restrictions
ALT+EDZ=show depots			L,f7=line speed markers
ALT+EI=layout description		P=buffers/stopblocks
ALT+ELL=delete route			D=depots
ALT+ELN=new/rename route		A=90 deg. roadway
ALT+ELS=show routes			A,f7=45 deg. roadway
ALT+EST=search for text			A,f7,f7=road bridges
ALT+H=help menu				A,f7,f7,f7,f7=water (f7 again for more)
ALT+HT=layout statistics		I=industrial buildings
ALT+ML=map all (track+scenery)		I,f7=railway buildings
ALT+MV=full screen			N=trees
ALT+MG=map tracks			N,f7,f7=Buildings (f7 again for more)
ALT+OC=transparent cursor		G=90 deg. track, rounded edges
ALT+S=stop/start clock (Panic!)		G,f7=45 deg. track
ALT+ZE=edit train			G,f8= 90deg. track, square edges
ALT+ZN=new train			S=colour light signals
ALT+ZZ=remove train set group		S,f7=semaphore signals
ALT+ZT=list of trains			S,f7,f7,f7=signal off contacts
f2=save layout				S,f8=platform sections (rail track set)
f3=load layout				H=stops with poles
f7=back through symbols			H,f7=stops with running in boards
f8=forward through symbols		T,f7,f7=terminals (timed stops) + poles
f9=rail/tram track toggle		T,f7,f7,f7=above with running in boards
f10=toggle description/lie of track 	W=45 deg. points/switches
<space>=invokes text input		W,f7=diagonal points
+=speed up clock			W,f7,f7=90 deg. points
-=slow down clock			K=crossings
Use ALT+ES (BAHN: ALT+EST) to search for a particular station name. You'll go straight there.
Use ALT+EDS (BAHN: ALT+EDZ) to show the list of depots. Double-click on the depot name to go straight there.
Occasionally BAHN320 will place spurious track sections, etc which can't be deleted. This seems to be either a bug in the way BAHN320 or DOS handles memory pointers, as it seems to occur as the layout grows to around the 100-130k size and if there are trains running.
Quite by chance I discovered a way of eliminating these nuisances by using another bug I found. This arose when I was making the London Underground layout. I had created a depot approached from below by an underline bridge. When a train entered the depot (or should I say was 'snapped up' by the depot!), it deleted the overline track section(s) immediately below the bridge exit element (#4 on the toolbar). The remedy was to avoid this type of depot entry.
When I first hit the 'unremovable element' bug (it was a spurious signal that had appeared, but couldn't be deleted because it couldn't be inactivated), I created a 'TPY' depot 2 elements above it, a #4 bridge 1 element above it, a #6 bridge below it, a few #4 track sections and a #4 bumper/buffer. I then created a temporary train, made it exit, and when it came back into the depot, it wiped out the offending element. The train, then depot and rest of the temporary elements were deleted and the proper track reinstated. This cured the problem. However I did have later instances of this bug recurring, and in one case a fix in one place caused spurious bits to pop up elsewhere, so after doing this fix, check out the layout for any oddities, such as trains jamming up where they shouldn't.
I have not noticed this problem in BAHN340.
Author's notes
Contents
Me neither. BAHN320/BAHN340 is a bit heavy going at first but worth persevering with. Tip: don't think model railway - I tried doing mine and it wasn't entirely satisfactory - think (rail) network, and preferably a real one.
> As I neither speak nor read a word of German, is there an
English
> version of the software available anywhere, along with instructions as
to
> how I can get the file you sent me to work?
Regrettably there's no English version available yet, although its predecessor, BAHN320 is in English (Sort of). I used BAHN because it has a number of improved features which I wished to exploit. I'll go through the startup procedure so you can get it running:
I'd first of all suggest that you boot up your computer in DOS only, ensuring that you have a mouse driver installed, but nothing else. BAHN320 annd BAHN use the 640k DOS memory to maximum effect so you need to have as much as possible available.
Change DOS directory to point at BAHN and type:
BAHN /Q <layout name>
and press return/enter.
This should start BAHN and load the layout. I put a title page actually in the layout which gives you instructions on getting a track map. If it's not visible when the layout loads press 'home' to find it. ALT+MG will get you the map - just point at the area you want, click, and then press Esc. The map will disappear and you'll find yourself in a 20x26 element screen. 'Page Up' and 'Page Down' move up and down a screenful respectively, and 'delete' and 'end' go left and right.
> Where can I find the English instructions and program details?
> How are you supposed to operate the simulation?
Operation is by and large confined to following trains and causing foul ups! (ie stopping trains on busy junctions, allowing things to back up and then restoring it to normal. It behaves just like the real thing!) You can if you wish create a special train then drive it around the network by following it manually. That can be fun. NB don't save a layout you've played around with.
Useful Hot Keys when looking at a layout for the first time:
[ALT]+[ML] - full detail map. Reduce scale by pressing [*], increase by pressing [/]. Move cursor to desired spot and press [esc] to go there.
[ALT]+[EDZ] - show depots. Click on depot to go straight there!
[ALT]+[EK] - Set Cursor. I've started to use this feature to go quickly to major locations. Click button beside the place you want to go to.
Click on any train and its details will appear. 'Verfolgen' button will activate the 'following' dialog - see below. [esc] closes the train details window.
> The times for the trains are pull out-pull in. If the line does
not go
> near the depot is it still possible to get the train to pull in. So
far
> I've been unsuccessful. If I name the depot at the switch, all of
the
> trains go there. Any ideas?
It's possible the 'normal' position of the switch is set wrong, or that they've been recalled already - and a recalled train can't pull out again till it's been into the depot, which it'll keep trying to find. Use ALT+ZT, then look for a red R against the train entry. When you're setting up the layout you need to ensure that you've set up a route for returning to depot, where it differs from that of the line.
Einrucken and Ausrucken - 'pull-in' and 'pull-out' respectively. You can force a train to pull-in at any time (sofort = immediately). There's a new feature in BAHN that allows you to pull in non stop if you wish (als dienstfahrt)
A junction switch may be set up only for pull-ins. Make no entry at all in the routes box. Set the bias (geradaus or abbiegen) for the normal (non-depot) direction and enter the depot code in the opposite field i.e. if the trains should turn off to pull-in, enter the depot code in the Abbiegen zur folgenden depots box and bias the switch to straight (geradeaus). Then only pull-ins will turn.
Section 7.5.1 of Alan Flavell's translation covers this topic.
> Although I got it to work, I had a tough time with the facing
point
> switches. It seems that you set the switch one way, then list the
> 'Lines' that go the other way. Is that right?
Correct - Hauptrichtung means 'main direction', geradeaus means 'straight on' and abbiegen means 'turn off'. You've probably twigged that you can enter times as well.
The zwischenablage is the clipboard - zur means 'to' and von means 'from'. This is sometimes useful when you're rearranging trackwork.
> I noticed on the Manhattan layout that you have some signs (I
think) at
> a few stations (53/7 is one). What are these for? When I call them
up,
> the only thing I see is a blank noted page.
If they're wee blue diamonds with a white 'I' in them they are Information Text markers. Just after I got BAHN I experimented with them - fine until I found I couldn't get rid of them. So I haven't used them - occasionally I'd accidentally bring up the text box, but I just closed it and no wee sign appeared. If you double click on a non active element and fill in the text box, the wee markers will appear. They don't go away when you blank the box tho'. There's an Editor option to switch them off BTW (ALT+OE, then uncheck 'Infotext markieren').
Some further information about Infotext (from Neil D.
Jackson):
Infotext works like this: double-click or hit return on any square (doesn't matter if it's blank, or has a graphic on it). One of the choices present will be "Infotext neu" (Alt-I) - use this to bring up a text box, where you can create your own infotext. Finishing with OK causes the infotext (i) symbol to appear on the display at the appropriate point (providing the global Editor option is checked, as you mention above).
If you repeat the process on a square which already has infotext stored for it, you'll notice the option changes to "Edit Infotext" instead, and you can go back and change your text at will.
To get rid of infotext is easy - simply edit the infotext as above, and delete everything using "Loschen/Lose" which clears the text-box. Then click OK. Once they're all zero, hit OK, and you'll find the blue (i) has disappeared. This seems to be the only way of removing them.
Because infotext is "position-related", you can an any time change the graphical map symbol which appears behind the (i), simply by "overprinting" with any of the usual screen-editing functions. This is why it seems like you cannot delete the (i)s - they physically need to be called up, emptied, and "OK"ed.
So what's the point of Infotext anyway? As far as I can tell, the only function of them is to pop-up displays as a train passes them. You need to be following a train (and you specifically need to access the "Following/Verfolgen..." menus via the Train/Zuge menu, rather than simply clicking on a train and hitting "Verfolgen"). Only in this dialog is the check-box "Infotexte anzeigen/see Infotext". When this is checked, as a train passes over an infotext (i) location, it'll pop up the infotext you stored here.
I guess you could use it to report interesting facts about the route, and have them appear "sequentially", as a train made a particular journey. Nice-ish, but I reckon it would be a bit boring after a while, and the stop-start jerkiness they impact onto the sim is not so nice at all.
Author's notes
> Am I correct in assuming that BAHN requires you to enter the
trains
> including schedule times and tacks and the sim does it
automatically?
Basically yes. Click on one of the 'T' platform sections and you'll see the booked departures. If you click on a train, you'll see its programmed pull-out and pull-in times.
In other words, you have to set up the RR just like the real thing.
It is NOT an easy program to master - there's a heck of a lot in it, but if you persevere with it it is utterly fascinating! You can actually see the railway working the way you want it to - well, nearly anyway! (and most railway managers would hope the real thing would and probably doesn't) I'd reckon on a learning curve of 20 hours or so. MANHATAN.NT3 took me two months of spare time - and Steve Hoskins had done most of the groundwork. You have to do a lot of preparation.
I believe that this is the best program of its kind anywhere. The lad who wrote it knows the transport business. To get the best from it you really have to have some fundamental transport skills such as rolling stock diagramming (how the sets/locos cycle between successive maintenance committments) and a reasonable knowledge of timetabling, signalling and routeing. You also have to be able to visualise the network as a whole as well.
> What are the objectives of it?
Creating a fully functioning railway, running realistically to time and without errors and conflicts. The real satisfaction lies in the building, far more than in the running - like an 'Erector' or 'Meccano' Set.
> How can I follow a specific train on the line?
Either click on a train and click the 'verfolgen' button or press [alt]+[zv] then enter the Route and Train number. Click 'ok'. Click 'Nein' against the 'Mit handsteurung?' prompt. 'Handsteurung' (manual operation) allows you to manually direct the train at turnouts - dangerous till you're familiar with how the layout's been routed.
[ALT]+[ELZ] will give a list of routes and the number of trains on it. All the trains on my systems are progressively numbered within each route.
[ALT]+[ZT] will give you a table of trains. When the table's on screen key 'D' will switch between the train summary and a summary of depot pull-ins and pull-outs. [Page up] and [page down] do the usual.
> Is there any translation of the dispatcher errors? At least for
the
> more common ones.
Yes - Here's the complete list:
Strecke ist unterbrochen - section too short. (i.e. no room to move train)
Frontal zusammenstop - Head on collision.
Tunnel Ausfarht ohne Einfahhrt - Tunnel exit with no entrance.
Tunnel Ausfarht ohne Einfahhrt - Tunnel exit with no entrance.
Zweite Tunneleinfahrte im Tunnelbereich - Two entrances in tunnel system.
Zug in Tunnel gestopped - Train stuck in tunnel.
Tunnelende verandert, wenden unmoglich - Tunnel end changed - turning impossible.
Zahleruberlauf bei Signale - Signal counter has exceeded limit.
Zahler bei Signalanlage bereits 0 - Signal counter has fallen below zero.
Blockade in inaktive Signalage - Blockage in inactive signal installation.
Nicht registiert Depot durchfahren - Attempt to run into unregistered depot.
Im fremdes Depot eingeruckt - Train has arrived in a foreign (strange) depot.
Einrucken fur ungeeigneten Zug - Pull in for unregistered train.
Ausrucken fur nicht eingeruckten Zug - Pull out for a train that's already out.
Blockade durch Zug im stop-zustand - Blockage caused by stopped train.
Abfahrt am Taktpunkte ausgefallen - Booked departure at timing point missed.
Stumpwieche gegen spitz befahren - Trailing point was run through in a facing direction.
Simulation stoppen wenn Nachricht eintrifft - Stop simulation when a warning message occurs.
> I ran into a bit of frustration yesterday. I was detailing the
leads to
> a yard and the switches kept messing up. I think I've used the
> 45 Deg turnouts as if they were diamond crossovers (X), but the
trains
> kept stalling. I finally gave up and made them separate single
> crossovers.
There is a way of doing it with the horizontal to diagonal switches (the set
that comes up when you press 'W' - here's how:
(double line - select the switches by number as shown)
Horizontal elements:
------- #2 #5 -------
------- #3 #4 -------
Vertical elements:
    #9 #8
    #6 #7
One comical effect is that occasionally one train cuts though another! I
can see that being difficult to fix, so I can't complain really.
You can't do it with diagonal to horizontal switches or the 90 degree ones -
with them you have to do 2 separate Xovers.
(More questions welcomed)
Abbruch			escape
Abfahren		depart, go now
Andern			different, changed
AUS-Kontakte		off contact
Ausrucken		leave depot
Balkensignale		tram/ light bar signal
Beenden			finish
Bild			screen /picture
Brucken			bridges
D-zug			fast train
Eilzug			semi-fast train
EIN-Kontakte		on contact
Einrucken		go into depot
Fenster			window
Formsignale		semaphoresignal
Gleise			lines
Guterzug		goods (freight) train
Halt			(station) stop
Kreuzungen		crossings
Langsamfahrstelle	Speed restriction
Lichtsignale		colour light signal
Loschen			lose, get rid of, delete
Maus			mouse
Nachste(r)		next
Personenzug		local train
Prellbocke		stop blocks
Punkt			point
Signale			signal
Sonderzug		Service/ Work train
Strassenbahn		street railway, tramway
TaktPunkt		timing point
Tunneleinfahrten	tunnel entrances
Verfolgen		follow
Voriger			previous
Wechsel			to change, alter
Weichen			switches
Wenden			to turn, change direction
Zug			train
Zuggarnitur		train formation
In Britain, the Sectional Appendices are books which supplement the WTTs and the Books of Rules and Regulations, and govern the local operations of a section of line, roughly equivalent to a Traffic or Operating Division. They contain a vast amount of information which I have found very useful indeed.
If you have access to British Railways documents, remember that Working and Public Timetables contain station to station mileages, whereas the Sectional Appendices contain distances between block posts. (Signal Boxes, Switch Towers). These mileages usually differ.
I'm sure many BAHN fans will have yet more to add to this, so look upon it as a starting point, and feel free to add to it. It would be best if you would send me an email or a file of hints, and I'll edit them in. Naturally you'll be credited.
Thanks to: Joe Korman, Peter Dougherty, Alan Flavell, Steve Hoskins, David Paxton, Neil D. Jackson and Jan Bochmann, BAHN's author.
Contents
Iain Logan, Langholm, Scotland
iainlogan@enterprise,net
![]() Electric Soup © I.W.Logan MCIT 1998. Last updated: 09 Jul 98 at
1400BST.
Electric Soup © I.W.Logan MCIT 1998. Last updated: 09 Jul 98 at
1400BST.
![]()